×
- Hello
- Login or Register
- Quick Links
- Live Chat
- Track Order
- Parts Availability
- RMA
- Help Center
- Contact Us
- Shop for
- Nissan Parts
- Nissan Accessories
My Garage
My Account
Cart
Genuine Nissan 300ZX Piston Ring Set
Piston Ring- Select Vehicle by Model
- Select Vehicle by VIN
Select Vehicle by Model
orMake
Model
Year
Select Vehicle by VIN
For the most accurate results, select vehicle by your VIN (Vehicle Identification Number).
15 Piston Ring Sets found

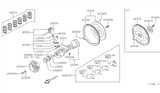
Nissan 300ZX Piston Ring Set
Part Number: 12033-F6511$273.65 MSRP: $386.52You Save: $112.87 (30%)Ships in 1-3 Business Days
Nissan 300ZX Ring Set Std
Part Number: 12033-21V00$128.37 MSRP: $181.32Limited AvailabilityYou Save: $52.95 (30%)


Nissan 300ZX Piston Ring Set
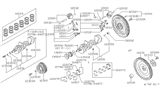
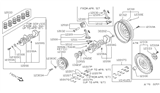
The Nissan 300ZX Piston Ring Set offers a secure seal that traps the air-fuel charge explosion, translating engine thrust into forward motion. The purpose of the Piston Ring Set is to create a sliding barrier between the piston and cylinder wall, block hot gases from leaking into the crankcase, move heat into the bore, and wipe excess oil back to the sump. In this manner, it helps keep the motor lubricated without filling it with fluid. Each Piston Ring Set consists of three rings. The top two are compression rings, and the bottom one is the oil control ring. All spring outward to make contact with the cylinder, allowing the piston to speed up and down thousands of times per minute. From the very first production run of every Nissan 300ZX model, thicker cast-iron rings were applied. These rings were tough but created friction. Subsequent evaluations of the Nissan 300ZX adopted slimmer ductile iron or steel pieces with plasma-moly or chrome faces, some only 1 mm thick for the top pair and 2 mm for the oil scraper, sharply reducing drag while improving seal quality and oil control. The innovative design of the Piston Ring Set imparts the stylish coupe with increased performance, reduced emissions, and greater durability, enhancements that help the contemporary Nissan sports car remain sprightly mile after mile. The Piston Ring Set is essential for optimal engine function.
If you need any OEM Nissan 300ZX Piston Ring Set, feel free to choose them out of our huge selection of genuine Nissan 300ZX Piston Ring Set. All our parts are offered at unbeatable prices and are supported by the manufacturer's warranty. In addition, we offer quick shipping to have your parts delivered to your door step in a matter of days.
Nissan 300ZX Piston Ring Set Parts Questions & Experts Answers
- Q: How to check and install a new piston ring set on the Nissan 300ZX before reassembly?A:Piston rings end gap must be measured before fitting new piston rings on the cylinder and piston of the engine, so that the piston ring side clearance is precise. Place a new ring set to each piston/connecting rod assembly and then measure the end gap of each set of rings you will have to maintain the same ring set with the same piston and cylinder only when reassembling. Slide the top ring into the first cylinder so that it sits correctly against the walls of the cylinder, do this by pushing it in with the help of the top of the piston. Using a feeler gauge, determine the value of end gap between the ring ends and record the results and check it to the end gap requirement. If any gap is found to be wider or narrower, ensure the right rings are in use. If a gap is small, it should be increased as ends of a ring may contact each other during its functioning in an engine that is devastating. Taking your time to carefully shape the ring ends with a fine toothed file, seeing to the fact the you should only be filing from outside in. If the end gap is way too big, then ensure that the correct size rings have been bought, and the kid wears them correctly. Perform the same process for all rings located in the first cylinder until such time that they match with rings, piston, and cylinder. After the ring end gaps have been chequered and set, the rings should be further fitted on the pistons; beginning from the three-piece oil control ring which should be set with the spacer/expander sliding into the groove, followed by the fitting of the lower side rail without necessarily having to use the piston ring installation tool as it is liable to bend the rail. Once the oil ring components are installed, the user can rotate the both side rails around the groove. Next to it, fit the middle ring with an identification that will distinguish it from the top ring and fit it in such a way that the marked side faces upwards to prevent confusion with the top ring; use a ring expander to avoid the top ring being mixed with the middle one. Lastly, put in the top ring in a similar fashion as the other rings with the identifications mark facing up and proceeded to set in the rest of the pistons and rings with both middle and top rings being different.


