×
- Hello
- Login or Register
- Quick Links
- Live Chat
- Track Order
- Parts Availability
- RMA
- Help Center
- Contact Us
- Shop for
- Nissan Parts
- Nissan Accessories
My Garage
My Account
Cart
Genuine Nissan 300ZX Rack And Pinion
Steering Rack And Pinion- Select Vehicle by Model
- Select Vehicle by VIN
Select Vehicle by Model
orMake
Model
Year
Select Vehicle by VIN
For the most accurate results, select vehicle by your VIN (Vehicle Identification Number).
38 Rack And Pinions found


| Page 1 of 2 |Next >
1-20 of 38 Results
Nissan 300ZX Rack And Pinion
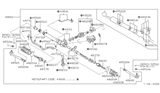
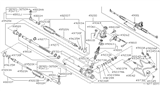
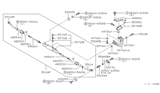
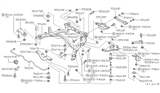
The mechanism of the Nissan 300ZX Rack And Pinion is responsible for converting the rotation of the steering wheel into a motion that turns the front wheels of steering systems. A Rack And Pinion set inside the steering wheel helps the steering wheel send a signal to the front end of the vehicle to steer it in the desired direction. Inside its metal housing, a circular pinion gear connected to the steering column meshes with a linear rack gear. When the wheel is turned, the pinion drives the rack left or right so the tie rods can pull or push the steering knuckles attached to the tires. The design prevents backlash, allowing effective control and feedback in this Rack And Pinion design. Due to relatively straight gear teeth, the Nissan 300ZX Rack And Pinion can have lower driving force needs. Furthermore, it can increase torque for a given ratio and run cooler than helical teeth. Unlike helical teeth, these do not add side torque and wear. The rack is fixed to the chassis tube while its ends link to tie rods, thereby forming a rigid path for transmitting steering force. Nissan 300ZX steering power assistance may be hydraulic or electric, which helps the Rack And Pinion to move while not changing the original mechanical processes. The layout of the Nissan 300ZX Rack And Pinion provides response and low complexity.
If you need any OEM Nissan 300ZX Rack And Pinion, feel free to choose them out of our huge selection of genuine Nissan 300ZX Rack And Pinion. All our parts are offered at unbeatable prices and are supported by the manufacturer's warranty. In addition, we offer quick shipping to have your parts delivered to your door step in a matter of days.
Nissan 300ZX Rack And Pinion Parts Questions & Experts Answers
- Q: How to replace the rack and pinion on Nissan 300ZX?A:Raise the front of the vehicle and support it securely on jackstands, then remove the splash shield. Detach the bolts attaching the hydraulic lines to the crossmember and place a drain pan under the rack and pinion to disconnect the flare nuts where the hydraulic lines enter the rack and pinion, allowing the fluid to drain into the pan while plugging all openings to prevent contamination. Remove the bolt securing the upper end of the lower joint shaft to the steering column, then disconnect the bolt securing the lower joint to the rack and pinion gear and separate the two pieces, ensuring the alignment spacer matches the lower joint coupling retraction groove. Remove the cotter pins and nuts securing the tie rods to the steering knuckles, using a suitable tool to separate them. Loosen the bolts securing the rack-and-pinion to the crossmember without removing them, then remove the nuts attaching the front engine mounting insulators to the crossmember. Securely connect an engine hoist to the lifting eyes on the engine and lift it slightly to relieve weight from the engine mounts, checking clearances around the engine, especially the fan shroud and vacuum lines. Remove the rack and pinion mounting bolts and lift the unit from the crossmember; if it needs overhauling, consult a qualified mechanic. Install the rack and pinion onto the crossmember and secure it with the mounting bolts, then carefully lower the engine, ensuring the mounts align with their insulators before installing the insulator nuts. Reattach the tie rods to the steering knuckles, securing them with nuts and cotter pins, then install the top of the lower steering column joint shaft without the through bolt until the lower end is installed, ensuring the groove in the coupling aligns with the notch on the pinion housing before installing the upper end through bolt. Connect the metal hydraulic fluid lines to the pinion housing and the fluid lines to the crossmember, replace the splash shield, and finally remove the jackstands to lower the vehicle.

Related Nissan 300ZX Parts
 Nissan 300ZX Sway Bar Bushing
 Nissan 300ZX Wheel Bearing
 Nissan 300ZX Shock Absorber
 Nissan 300ZX Coil Spring Insulator
 Nissan 300ZX Steering Wheel
 Nissan 300ZX Control Arm
 Nissan 300ZX Wheel Cover
 Nissan 300ZX Coil Springs
 Nissan 300ZX Steering Knuckle
 Nissan 300ZX Sway Bar Link
 Nissan 300ZX Power Steering Pump
 Nissan 300ZX Ball Joint