×
- Hello
- Login or Register
- Quick Links
- Live Chat
- Track Order
- Parts Availability
- RMA
- Help Center
- Contact Us
- Shop for
- Nissan Parts
- Nissan Accessories
My Garage
My Account
Cart
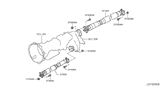
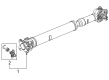
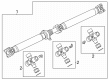
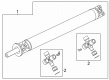
Genuine Nissan Armada Drive Shaft
Axle Shaft- Select Vehicle by Model
- Select Vehicle by VIN
Select Vehicle by Model
orMake
Model
Year
Select Vehicle by VIN
For the most accurate results, select vehicle by your VIN (Vehicle Identification Number).
19 Drive Shafts found


Nissan Armada Propeller Shaft
Part Number: 37200-ZZ70A$439.50 MSRP: $620.77You Save: $181.27 (30%)Ships in 1-3 Business Days
Nissan Armada Shaft Assembly Propeller
Part Number: 37200-ZP90A$439.50 MSRP: $620.77You Save: $181.27 (30%)Ships in 1-3 Business Days
Nissan Armada Shaft Assembly Propeller
Part Number: 37000-1LA0A$1549.35 MSRP: $1875.73You Save: $326.38 (18%)Ships in 1-3 Business Days
Nissan Armada PROPELLAR Shaft
Part Number: 37300-ZV60B$630.65 MSRP: $890.75You Save: $260.10 (30%)Ships in 1-3 Business Days
Nissan Armada Shaft Rear PROPELLER
Part Number: 37300-1LA0A$1116.69 MSRP: $1577.25You Save: $460.56 (30%)Ships in 1-3 Business Days
Nissan Armada Propeller Shaft
Part Number: 37200-5X00A$809.59 MSRP: $1143.48You Save: $333.89 (30%)Ships in 1-3 Business Days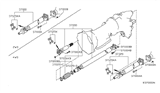
Nissan Armada Shaft Rear PROPELLER
Part Number: 37300-7S10B$590.72 MSRP: $770.17You Save: $179.45 (24%)Ships in 1-3 Business Days
Nissan Armada Shaft Assembly Propeller
Part Number: 37000-ZV50B$661.61 MSRP: $934.08You Save: $272.47 (30%)Ships in 1-2 Business DaysNissan Armada PROPELLAR Shaft
Part Number: 37300-ZV60A$630.65 MSRP: $890.75You Save: $260.10 (30%)Ships in 1-3 Business DaysNissan Armada Propeller Shaft
Part Number: 37200-ZE20A$439.50 MSRP: $620.77You Save: $181.27 (30%)Ships in 1-3 Business DaysNissan Armada Rear Propeller Shaft Assembly
Part Number: 37300-ZE20A$630.65 MSRP: $890.75You Save: $260.10 (30%)Ships in 1-3 Business DaysNissan Armada Shaft Assembly Propeller
Part Number: 37000-ZV50A$661.33 MSRP: $934.08You Save: $272.75 (30%)Ships in 1-3 Business DaysNissan Armada Propeller Shaft Assembly
Part Number: 37000-ZE00A$661.33 MSRP: $934.08You Save: $272.75 (30%)
Nissan Armada PROPELLER SHAFT ASSY-FRONT
Part Number: 37200-7KA0A$507.74 MSRP: $717.15You Save: $209.41 (30%)Ships in 1-2 Business Days
Nissan Armada PROPELLER SHAFT ASSY
Part Number: 37000-7JA0A$502.96 MSRP: $710.40You Save: $207.44 (30%)Ships in 1-2 Business Days
Nissan Armada PROPELLER SHAFT ASSY-REAR
Part Number: 37300-7KA0A$616.90 MSRP: $871.33You Save: $254.43 (30%)Nissan Armada PROPELLER SHAFT ASSY-REAR
Part Number: 37300-7JA0A$616.90 MSRP: $871.33You Save: $254.43 (30%)Ships in 1-2 Business Days
Nissan Armada Drive Shaft
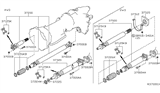
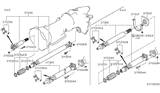
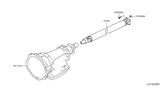
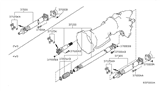
The Nissan Armada Drive Shaft is the component that transfers the engine's torque from the transmission or transfer case to the axle assemblies. In the case of a Nissan Armada with a rear-wheel drive configuration, the Drive Shaft is a hollow metal tube having yokes at each end that carry universal joints that permit pivoting as the suspension moves. The arrangement of the four-wheel drive on the Armada employs a Drive Shaft linking the transfer case to the front differential by means of cardan or constant-velocity joints. These allow for steeper operating angles. The flexible couplings allow smooth movement, and when the vehicle length dictates, a two-piece Drive Shaft can be employed in the Nissan drivetrain with a center support bearing. Common service issues for the Nissan system are noise or vibration due to worn U-joints, imbalance as a result of dented or missing weights, dirt, and incorrect operating angles if too much weight is on the Armada, helping the Drive Shaft stay key to consistent drive.
If you need any OEM Nissan Armada Drive Shaft, feel free to choose them out of our huge selection of genuine Nissan Armada Drive Shaft. All our parts are offered at unbeatable prices and are supported by the manufacturer's warranty. In addition, we offer quick shipping to have your parts delivered to your door step in a matter of days.
Nissan Armada Drive Shaft Parts Questions & Experts Answers
- Q: How to remove and install the drive shaft on the Nissan Armada?A:Raise the vehicle and support it securely on jackstands. Place the transmission in Neutral with the parking brake off. Make reference marks on the driveshaft flange and the pinion flange in line with each other. Remove the rear universal joint nuts and bolts. Turn the driveshaft (or wheels) as necessary to bring the bolts into the most accessible position. If you're working on a model with a two-piece driveshaft, unbolt the center support bearing from the crossmember. Lower the rear of the driveshaft, then slide the front yoke out of the transmission or transfer case. Wrap a plastic bag over the transmission or transfer case housing and hold it in place with a rubber band. This will prevent loss of fluid and protect against contamination while the driveshaft is out. Remove the plastic bag from the transmission or transfer case and wipe the area clean. Inspect the oil seal carefully. Slide the front yoke of the driveshaft into the transmission or transfer case, being careful not to damage the seal in the process. If you're working on model with a two-piece driveshaft, raise the center support bearing into position, install the fasteners and tighten them securely. Raise the rear of the driveshaft into position, checking to be sure the marks are in alignment. If not, turn the rear wheels to match the pinion flange and the driveshaft. Install the new bolts and nuts, tightening them securely. For 4WD models, raise the front of the vehicle and place it securely on jackstands. Remove the skid plate, if equipped. Mark the relationship of the driveshaft to the front differential companion flange and to the transfer case companion flange. Remove the bolts and nuts from the flanges, then lower the shaft from the vehicle. Attach the ends of the shaft to the differential and transfer case companion flanges, install the new bolts and nuts and tighten them securely. Install the skid plate if equipped.

Related Nissan Armada Parts
 Nissan Armada Lug Nuts
 Nissan Armada Wheel Stud
 Nissan Armada Torque Converter
 Nissan Armada Wheel Bearing
 Nissan Armada Shift Cable
 Nissan Armada Wheel Hub
 Nissan Armada Transmission Assembly
 Nissan Armada Axle Shaft
 Nissan Armada Transfer Case
 Nissan Armada Shift Indicator
 Nissan Armada Wheel Seal
Browse by Year
2025 Drive Shaft 2024 Drive Shaft 2023 Drive Shaft 2022 Drive Shaft 2021 Drive Shaft 2020 Drive Shaft 2019 Drive Shaft 2018 Drive Shaft 2017 Drive Shaft 2015 Drive Shaft 2014 Drive Shaft 2013 Drive Shaft 2012 Drive Shaft 2011 Drive Shaft 2010 Drive Shaft 2009 Drive Shaft 2008 Drive Shaft 2007 Drive Shaft 2006 Drive Shaft 2005 Drive Shaft 2004 Drive Shaft