×
- Hello
- Login or Register
- Quick Links
- Live Chat
- Track Order
- Parts Availability
- RMA
- Help Center
- Contact Us
- Shop for
- Nissan Parts
- Nissan Accessories
My Garage
My Account
Cart
Genuine Nissan Pathfinder Rack And Pinion
Steering Rack And Pinion- Select Vehicle by Model
- Select Vehicle by VIN
Select Vehicle by Model
orMake
Model
Year
Select Vehicle by VIN
For the most accurate results, select vehicle by your VIN (Vehicle Identification Number).
32 Rack And Pinions found


Nissan Pathfinder Gear & Linkage
Part Number: 49001-ZP50A$704.66 MSRP: $1079.80You Save: $375.14 (35%)


Nissan Pathfinder Gear & Linkage
Part Number: 49001-ZP00A$704.66 MSRP: $1079.80You Save: $375.14 (35%)Ships in 1-3 Business Days
Nissan Pathfinder Power Steering Gear & Linkage Assembly
Part Number: 49001-9NC0A$1036.36 MSRP: $1586.20You Save: $549.84 (35%)Ships in 1-3 Business Days
Nissan Pathfinder Gear & Linkage
Part Number: 49001-3KA0A$1016.50 MSRP: $1558.51You Save: $542.01 (35%)Ships in 1-3 Business Days

Nissan Pathfinder Power Steering Gear & Linkage
Part Number: 49001-4W000$1520.74 MSRP: $2054.99You Save: $534.25 (26%)Ships in 1-3 Business DaysNissan Pathfinder Power Steering Gear & Linkage
Part Number: 49001-EA000$704.66 MSRP: $1079.80You Save: $375.14 (35%)Ships in 1-3 Business Days
Nissan Pathfinder Gear & Linkage
Part Number: 49001-6SA0C$1342.97 MSRP: $1767.06You Save: $424.09 (24%)Ships in 1-3 Business Days


| Page 1 of 2 |Next >
1-20 of 32 Results
Nissan Pathfinder Rack And Pinion
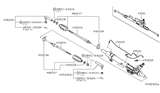
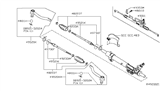
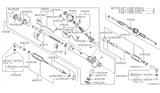
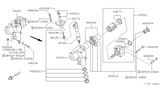
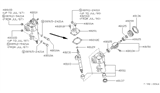
The Nissan Pathfinder Rack And Pinion mechanism converts the rotational motion of the steering wheel into lateral motion, enabling the turning of the front wheels. A linear Rack And Pinion gear mounted in a metal tube attached to the chassis is coupled to the steering column. Thus, when they actuate, the Rack And Pinion moves sideways. Tie-rods attached to each end of the rack move the steering knuckles that hold the wheels. On a Nissan Pathfinder, straight rack gears are often preferred because they need less driving force. Moreover, they generate greater torque per gear ratio and operate at lower temperatures. In contrast, helical gears can cause extra side torque and tend to wear more quickly. The assembly can be assisted by hydraulic or electric power such that steering effort is reduced with no loss in feedback. The Rack And Pinion mechanism ensures little backlash and accurate control supporting precise steering of the Pathfinder. Nissan's steering design provides predictable handling for Pathfinder, and the Rack And Pinion allows Nissan owners a direct road feel.
If you need any OEM Nissan Pathfinder Rack And Pinion, feel free to choose them out of our huge selection of genuine Nissan Pathfinder Rack And Pinion. All our parts are offered at unbeatable prices and are supported by the manufacturer's warranty. In addition, we offer quick shipping to have your parts delivered to your door step in a matter of days.
Nissan Pathfinder Rack And Pinion Parts Questions & Experts Answers
- Q: How to remove the Rack and Pinion steering gear on the Nissan Pathfinder?A:From beneath the vehicle, loosen the front wheel nuts. Then lift up the front end, place jackstands, apply the parking brake, and take off the front wheels. To get to the front stabilizer bar bracket bolts, first take off the vehicle's under-guard, then move the crossmember brace. Remember, the Pathfinder requires you to remove this brace before reaching these bolts. Look at the positioning of the transfer gear coupler shaft in relation to the Rack And Pinion input shaft. Remove the pinch bolt keeping everything in proper alignment, using the gap in the coupler to match the line on the cap, which should point to the gear housing protrusion when the steering gear is centered. First disconnect the tie-rod ends from both steering knuckles, take off the brackets for the swaybar, and place a drain pan right under the steering gear to catch any fluid leaks. Take off the bolts that hold the banjo lines connected to power steering's pressure and return sides. Disconnect the lines from the steering gear unit. Cap the lines to stop leaks, and dump out and throw away the sealing washers you find there. You need fresh replacement washers when installing everything again. Separate the power steering pressure line fastening bolts from the crossmember front, take out the bolts, and take off the brackets as you disconnect the connecting shaft, while lowering the steering equipment from the car. Setting up the new rack goes the other way, making sure it sits correctly in the gear box: line up the point on the cover lid match with housing's mark, and put the gear coupler tube gap over its matching spot. First, tighten all parts to the correct torque rating, then apply force to wheel lug nuts to meet torque specifications, view and add fluid to power steering where necessary, and finish with pressurized fluid flushing.

Related Nissan Pathfinder Parts
 Nissan Pathfinder Coil Spring Insulator
 Nissan Pathfinder Wheel Bearing
 Nissan Pathfinder Control Arm
 Nissan Pathfinder Sway Bar Bushing
 Nissan Pathfinder Shock Absorber
 Nissan Pathfinder Wheel Cover
 Nissan Pathfinder Coil Springs
 Nissan Pathfinder Steering Wheel
 Nissan Pathfinder Sway Bar Link
 Nissan Pathfinder Steering Knuckle
 Nissan Pathfinder Ball Joint
 Nissan Pathfinder Power Steering Pump
Browse by Year
2025 Rack And Pinion 2024 Rack And Pinion 2023 Rack And Pinion 2022 Rack And Pinion 2020 Rack And Pinion 2019 Rack And Pinion 2018 Rack And Pinion 2017 Rack And Pinion 2016 Rack And Pinion 2015 Rack And Pinion 2014 Rack And Pinion 2013 Rack And Pinion 2012 Rack And Pinion 2011 Rack And Pinion 2010 Rack And Pinion 2009 Rack And Pinion 2008 Rack And Pinion 2007 Rack And Pinion 2006 Rack And Pinion 2005 Rack And Pinion 2004 Rack And Pinion 2003 Rack And Pinion 2002 Rack And Pinion 2001 Rack And Pinion 2000 Rack And Pinion 1999 Rack And Pinion 1998 Rack And Pinion 1997 Rack And Pinion 1996 Rack And Pinion 1995 Rack And Pinion 1994 Rack And Pinion 1993 Rack And Pinion 1992 Rack And Pinion 1991 Rack And Pinion 1990 Rack And Pinion 1989 Rack And Pinion 1988 Rack And Pinion 1987 Rack And Pinion