×
- Hello
- Login or Register
- Quick Links
- Live Chat
- Track Order
- Parts Availability
- RMA
- Help Center
- Contact Us
- Shop for
- Nissan Parts
- Nissan Accessories
My Garage
My Account
Cart
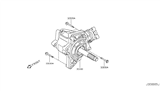
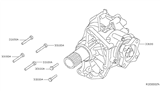
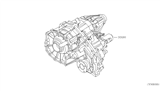
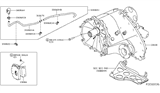
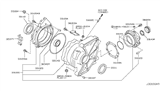
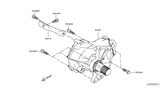
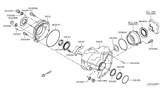
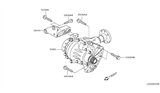
Genuine Nissan Transfer Case
Speed Transfer Case- Select Vehicle by Model
- Select Vehicle by VIN
Select Vehicle by Model
orMake
Model
Year
Select Vehicle by VIN
For the most accurate results, select vehicle by your VIN (Vehicle Identification Number).
133 Transfer Cases found


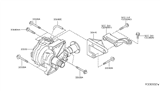
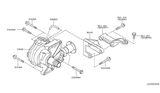
Nissan Transfer Assembly
Part Number: 33100-3KA0B$2527.09 MSRP: $3059.43You Save: $532.34 (18%)Ships in 1-2 Business DaysProduct Specifications- Other Name: Transfer Assy; Transfer Case
- Replaced by: 33100-3KA0C


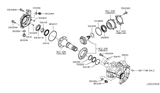
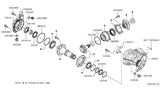
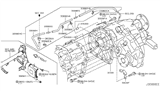
Nissan Case-Transfer
Part Number: 33103-3KA0A$871.93 MSRP: $1231.53You Save: $359.60 (30%)Ships in 1-3 Business DaysProduct Specifications- Manufacturer Note: RYOBI
- Replaced by: 33103-3KA0C


Nissan Transfer Assembly
Part Number: 33100-JG20A$2595.32 MSRP: $3142.03You Save: $546.71 (18%)Ships in 1-3 Business DaysProduct Specifications- Other Name: Transfer Assy; Transfer Case


Nissan Transfer Assembly
Part Number: 33100-4BA0D$1742.45 MSRP: $2109.50You Save: $367.05 (18%)Ships in 1-3 Business DaysProduct Specifications- Other Name: Transfer Assy; Transfer Case
- Replaces: 33100-4BA0B

Nissan Transfer Assembly
Part Number: 33100-4BA0B$1742.45 MSRP: $2109.50You Save: $367.05 (18%)Ships in 1-3 Business DaysProduct Specifications- Other Name: Transfer Assy; Transfer Case
- Replaced by: 33100-4BA0D

Nissan Transfer Assembly
Part Number: 33100-EA33A$2865.36 MSRP: $3468.96You Save: $603.60 (18%)Ships in 1-3 Business DaysProduct Specifications- Other Name: Transfer Assy; Transfer Case
- Replaces: 33100-EA31B, 33100-EA310
 Product Specifications
- Manufacturer Note: AHRESTY
- Replaced by: 33103-3KA0C
- Replaces: 33103-3KA0A

Nissan Transfer Assembly
Part Number: 33100-JP11C$2897.61 MSRP: $3508.00You Save: $610.39 (18%)Ships in 1-3 Business DaysProduct Specifications- Other Name: Transfer Assy; Transfer Case
- Replaces: 33100-JP11B, 33100-JP00B, 33100-JP01C, 33100-JP01B, 33100-JP11A

Nissan Transfer Assembly
Part Number: 33100-6RA0A$1354.73 MSRP: $1640.11You Save: $285.38 (18%)Ships in 1-3 Business DaysProduct Specifications- Other Name: Transfer Assy; Transfer Case

Nissan Transfer Assembly
Part Number: 33100-EZ20A$2783.84 MSRP: $3370.27You Save: $586.43 (18%)Ships in 1-3 Business DaysProduct Specifications- Other Name: Transfer Assy; Transfer Case

Nissan Case Set-Transfer
Part Number: 33101-JP11B$1402.90 MSRP: $1698.43You Save: $295.53 (18%)Ships in 1-3 Business DaysProduct Specifications- Replaces: 33101-JP11A, 33101-JP00B
Nissan Transfer Assembly
Part Number: 33100-4BB0C$1660.73 MSRP: $2010.57You Save: $349.84 (18%)Ships in 1-3 Business DaysProduct Specifications- Other Name: Transfer Assy; Transfer Case
Nissan Transfer Assembly
Part Number: 33100-EZ50B$1134.51 MSRP: $1602.42You Save: $467.91 (30%)Ships in 1-3 Business DaysProduct Specifications- Other Name: Transfer Assy; Transfer Case
Nissan Transfer Assembly
Part Number: 33100-EZ00A$2534.39 MSRP: $3068.27You Save: $533.88 (18%)Ships in 1-3 Business DaysProduct Specifications- Other Name: Transfer Assy; Transfer Case


Nissan Transfer Assembly
Part Number: 33100-7S11C$2888.13 MSRP: $3496.53You Save: $608.40 (18%)Ships in 1-3 Business DaysProduct Specifications- Other Name: Transfer Assy; Transfer Case
- Replaces: 33100-7S11A

Nissan Transfer Assembly
Part Number: 33100-EA32A$3568.73 MSRP: $4320.50You Save: $751.77 (18%)Ships in 1-3 Business DaysProduct Specifications- Other Name: Transfer Assy; Transfer Case
- Replaces: 33100-EA301, 33100-EA30A, 33100-EA30C

Nissan Transfer Assembly
Part Number: 33100-EA310$2865.36 MSRP: $3468.96You Save: $603.60 (18%)Ships in 1-3 Business DaysProduct Specifications- Other Name: Transfer Assy
- Replaced by: 33100-EA33A

Nissan Case-Transfer
Part Number: 33103-4BA0B$953.11 MSRP: $1346.20You Save: $393.09 (30%)Ships in 1-3 Business DaysProduct Specifications- Replaced by: 33103-4BA0C

Nissan Transfer Assembly
Part Number: 33100-1KD0A$2593.89 MSRP: $3140.30You Save: $546.41 (18%)Ships in 1-3 Business DaysProduct Specifications- Other Name: Transfer Assy
 Product Specifications
- Other Name: Transfer Assy; Transfer Case
- Replaces: 33100-1LA0D, 33100-1LA0A
| Page 1 of 7 |Next >
1-20 of 133 Results
About Nissan Transfer Case
A transfer case is a part of the drive system found on vehicles with four-wheel-drive and all-wheel-drive. A Nissan transfer case sends power from the transmission to the front and rear axles, enabling the wheels to spin. It also synchronizes the difference between the rotation of the front and rear wheels, which is necessary since the front and rear tires don't turn at the same speed if they're of differing sizes.
Nissan Transfer Case Parts Questions & Experts Answers
- Q: How to disconnect and remove the transfer case for a Nissan Frontier?A:Disconnect the cable that carries power into your battery from the battery's negative terminal. Rise your vehicle up using jackstands, then hold it firmly in position. Remove the skid plate, if equipped. Drain the transfer case lubricant. Remove the front and rear driveshafts. If you have a Frontier or Xterra, take out the torsion bars from the front suspension. Take all electrical plugs off and disconnect the transfer case vent hose from its top. Rest the vehicle using a floor jack while adding wood under the jack's head to distribute the weight evenly. Secure the transfer case using a jack made for this job, then add security chains to keep it steady. Lower the jack holding up the transmission mount from the cross member, then take off the cross member. Loosen both jack supports for the transmission and transfer case until you can easily reach the upper bolts. Take out the transmission-to-transfer case bolts. On some models, you'll find two different lengths of bolts, so keep track of them during and after removal. Check once again that all transfer case wires and hoses are removed. Then slide the transfer case towards the back of the vehicle, keeping it level, until the transfer case clears the transmission. After you've cleared the input shaft, move your transfer case away and take it out from underneath your vehicle. To put back the transfer case, we add sealant to where it connects to the transmission, put bolts on the transmission to the transfer case, following correct bolt locations and bolt tightening guidelines, refill the transfer case with needed fluid, and for our Frontier and Xterra work, we put back and adjust the torsion bars.

Related Nissan Parts
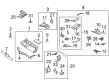
 Nissan Transfer Case Seal
 Nissan Transfer Case Output Shaft Snap Ring
 Nissan Output Shaft Bearing
 Nissan Transfer Case Cover
 Nissan Transfer Case Shim
Browse by Model
720 Pickup Transfer Case Altima Transfer Case Armada Transfer Case Axxess Transfer Case Frontier Transfer Case Hardbody Pickup (D21) Transfer Case Hardbody Pickup (D21U) Transfer Case Juke Transfer Case Murano Transfer Case Pathfinder Transfer Case Rogue Sport Transfer Case Rogue Transfer Case Sentra Transfer Case Stanza Transfer Case Titan Transfer Case Xterra Transfer Case