×
- Hello
- Login or Register
- Quick Links
- Live Chat
- Track Order
- Parts Availability
- RMA
- Help Center
- Contact Us
- Shop for
- Nissan Parts
- Nissan Accessories
My Garage
My Account
Cart
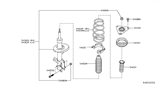
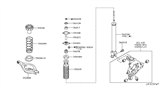
Genuine Nissan Coil Springs
Strut Spring- Select Vehicle by Model
- Select Vehicle by VIN
Select Vehicle by Model
orMake
Model
Year
Select Vehicle by VIN
For the most accurate results, select vehicle by your VIN (Vehicle Identification Number).
754 Coil Springs found


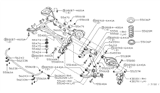
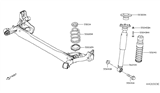
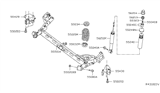
Nissan Rear Suspension Spring
Part Number: 55020-ZQ20B$83.52 MSRP: $117.97You Save: $34.45 (30%)Ships in 1-2 Business DaysProduct Specifications- Other Name: Spring-Rear Suspension; Coil Spring, Spring
- Position: Rear

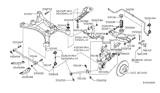
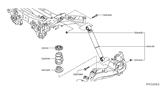
Nissan Rear Suspension Spring
Part Number: 55020-JA01C$65.34 MSRP: $92.28You Save: $26.94 (30%)Ships in 1-3 Business DaysProduct Specifications- Other Name: Spring-Rear Suspension; Coil Spring, Spring
- Position: Rear


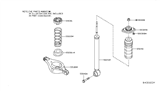
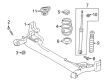
Nissan Rear Suspension Spring
Part Number: 55020-3JA0C$117.53 MSRP: $166.00You Save: $48.47 (30%)Ships in 1-3 Business DaysProduct Specifications- Other Name: Spring-Rear Suspension; Coil Spring, Spring
- Position: Rear


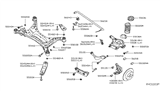
Nissan Rear Suspension Spring
Part Number: 55020-9HS0B$92.39 MSRP: $130.50You Save: $38.11 (30%)Ships in 1-3 Business DaysProduct Specifications- Other Name: Spring-Rear Suspension; Coil Spring, Spring
- Position: Rear
- Replaces: 55020-9HS0C


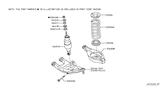
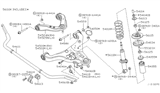
Nissan Spring Front RH
Part Number: 54010-9TA1C$133.59 MSRP: $188.68You Save: $55.09 (30%)Ships in 1-3 Business DaysProduct Specifications- Other Name: Spring-Front; Coil Spring, Spring
- Position: Front Passenger Side
- Replaces: 54010-9TA1A, 54010-5HA1B, 54010-4BA1A, 54010-4BA1C, 54010-9TA1B


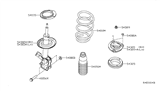
Nissan Front Spring
Part Number: 54010-7S102$150.30 MSRP: $212.29You Save: $61.99 (30%)Ships in 1-3 Business DaysProduct Specifications- Other Name: Spring-Front; Coil Spring, Spring
- Position: Front

Nissan Rear Suspension Spring
Part Number: 55020-JA01B$64.65 MSRP: $91.32You Save: $26.67 (30%)Ships in 1-2 Business DaysProduct Specifications- Other Name: Spring-Rear Suspension; Coil Spring, Spring
- Position: Rear


Nissan Rear Suspension Spring
Part Number: 55020-ZL15A$90.54 MSRP: $127.89You Save: $37.35 (30%)Ships in 1-3 Business DaysProduct Specifications- Other Name: Spring-Rear Suspension; Coil Spring, Spring
- Position: Rear


Nissan Rear Suspension Spring
Part Number: 55020-AM82A$317.45 MSRP: $469.40You Save: $151.95 (33%)Ships in 1-2 Business DaysProduct Specifications- Other Name: Spring-Rear Suspension. This item is non-returnable.; Coil Spring, Spring
- Position: Rear
- Replaces: 55020-AM820

 Product Specifications
- Other Name: Spring-Rear Suspension; Coil Spring, Spring
- Position: Rear
- Replaces: 55020-5RL0A
Nissan Rear Suspension Spring
Part Number: 55020-1LA8C$373.73 MSRP: $527.87You Save: $154.14 (30%)Ships in 1-3 Business DaysProduct Specifications- Other Name: Spring-Rear Suspension; Coil Spring, Spring
- Position: Rear
- Replaces: 55020-1LA8A

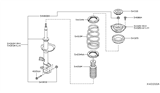
Nissan Front Spring
Part Number: 54010-4AF4B$77.89 MSRP: $110.02You Save: $32.13 (30%)Ships in 1-3 Business DaysProduct Specifications- Other Name: Spring-Front; Spring
- Position: Front

Nissan Front Spring
Part Number: 54010-ZN90A$16.67 MSRP: $22.98Limited AvailabilityYou Save: $6.31 (28%)Product Specifications- Other Name: Spring-Front; Coil Spring, Spring
- Position: Front
- Replaces: 54010-EM04A, 54010-EM00A


Nissan Rear Suspension Spring
Part Number: 55020-6LB2A$49.06 MSRP: $67.63You Save: $18.57 (28%)Ships in 1-3 Business DaysProduct Specifications- Other Name: Spring-Rear Suspension; Coil Spring, Spring
- Position: Rear

 Product Specifications
- Other Name: Spring-Rear Suspension; Coil Spring, Spring
- Position: Rear
- Replaces: 55020-3TA0B


 Product Specifications
- Other Name: Spring-Rear Suspension; Coil Spring, Spring
- Position: Rear


 Product Specifications
- Other Name: Spring-Rear Suspension; Coil Spring, Spring
- Position: Rear
- Replaces: 55020-5HA1B


 Product Specifications
- Other Name: Spring-Front; Coil Spring, Spring
- Position: Front

 Product Specifications
- Other Name: Spring-Rear Suspension; Coil Spring, Spring
- Position: Rear

 Product Specifications
- Other Name: Spring-Rear Suspension; Coil Spring, Spring
- Position: Rear
| Page 1 of 38 |Next >
1-20 of 754 Results
Nissan Coil Springs Parts Questions & Experts Answers
- Q: What factors should you consider before working on the front coil springs and shock absorber showing signs of wear on Nissan Altima?A:If the struts or coil springs show signs of wear such as leaking fluid, loss of damping capability, or physical damage like chips or cracks, consider all options before starting any work, as strut/shock absorber assemblies are not serviceable and must be replaced if issues arise. Strut assemblies with springs may be available on an exchange basis, which can save time and effort, so check the cost and availability of parts before disassembling the vehicle. To disassemble, remove the strut and spring assembly, mount it in a vise lined with wood or rags to prevent damage, and avoid excessive tightening. Following the tool manufacturer's instructions, install a spring compressor to relieve pressure from the upper spring seat, which can be verified by wiggling the spring. Remove the piston rod nut and the upper suspension support, inspecting the bearing for smooth operation and checking the rubber for any signs of deterioration. Lift the spring seat and upper insulator from the piston rod, checking the rubber spring seat for damage. Carefully lift the compressed spring from the assembly, ensuring the ends are pointed away from your body, and set it aside safely. Slide the dust boot off the piston rod and check the lower insulator for wear, replacing it if necessary. For reassembly, if replacing the lower insulator, position it correctly and extend the damper rod to install the dust boot. Place the coil spring onto the lower insulator, ensuring the end fits into the recessed portion. Install the upper insulator and spring seat, aligning the marks or arrows correctly, then install the dust seal and suspension support to the piston rod, tightening the nut to the specified torque before reinstalling the strut/shock absorber and coil spring assembly.
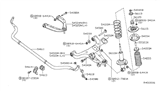
- Q: How to properly remove and install a front coil springs and shock absorber on Nissan Murano?A:Take the wheels off,turn the front wheel lug nuts until they are loose, lift the front of the car, and only then put it on jackstands safely. Then, unfasten a bolt and nut that secures the wheel speed sensor to the bracket and pull the brake hose off the strut's bracket. Remove the nut of link to the stabilizer bar, and strut-to-knuckle bolts by using hammer and punch on the bolts. Cautiously take the strut apart from the steering knuckle, do not over stretch the inner CV joint and do not allow the knuckle to fall to the outside as this will damage the brake hose and ABS speed sensor wiring if the car is equipped with them. Unscrew the cowl cover to expose the upper section of the struts: supporting the strut and spring assembly with your hand, unscrew the three upper mounting bolts and then pull the assembly from the fenderwell. Curiously examine the strut body for evidence of fluid leakage, dents, splits, and other types of damage that will need repair or replacement and looks for chips or cracks in the protective coating of the coil spring, and signs of cuts, hardness, or other types of deterioration on the spring seat. If any problem is identified, go to the next step of the disassembly of the strut. For installation, insert the strut assembly into the fader well and fit the upper mounting bolts then tight them to factory recommended torque and preferably in twos given the weight and of the strut assembly. Place the steering knuckle into the Subaru strut flange, put the bolts into the holes, and screw on the nuts, torque to the specified value. Perform the following actions to complete the removal process: tighten the stabilizer bar link nut, then tighten the wheel lug nuts to the specified torque; the front end alignment check and adjustment might also be required.
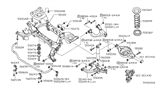
- Q: How to replace the coil springs and shock absorber on the front struts of a Nissan Pathfinder?A:If the struts or coil springs exhibit signs of wear such as leaking fluid, loss of damping capability, chipped, sagging or cracked coil springs, explore all options before beginning any work. The strut shock absorber assemblies are not serviceable and must be replaced if a problem develops. However, strut assemblies complete with springs may be available on an exchange basis, which eliminates much time and work. Check on the cost and availability of parts before disassembling your vehicle. Remove the strut and spring assembly. Mount the strut assembly in a vise. Line the vise jaws with wood or rags to prevent damage to the unit and don't tighten the vise excessively. Install the spring compressor on the spring and compress it sufficiently to relieve all pressure from the upper spring seat. This can be verified by wiggling the spring. Remove the piston rod nut. Remove the upper mount. Inspect the bearing in the mount for smooth operation. If it does not turn smoothly, replace it. Check the rubber portion of the mount for cracking and general deterioration. If there is any separation of the rubber, replace it. Lift the springseat and upper insulator from the piston rod. Check the rubber springseat for cracking and hardness, replacing it if necessary. Carefully lift the compressed spring from the assembly and set it in a safe place. Slide the dust boot off the piston rod. Check the lower insulator for wear, cracking and hardness and replace it if necessary. If the lower insulator is being replaced, set it into position with the dropped portion seated in the lowest part of the seat. Extend the damper rod to its full length and install the dust boot. Carefully place the coil spring onto the lower insulator, with the end of the spring resting in the lowest part of the insulator. Install the upper insulator and the spring seat. Make sure the cutout on the spring seat is facing in, away from the strut-to-knuckle flange. Install the dust seal and upper mount to the piston rod. Install a new piston rod nut and tighten it to the torque. Install the strut assembly.


Related Nissan Parts
 Nissan Shock Absorber
 Nissan Leaf Spring Bushing
 Nissan Leaf Spring
 Nissan Coil Spring Insulator
 Nissan Shock And Strut Mount
 Nissan Strut Bearing
 Nissan Rear Crossmember
 Nissan Leaf Spring Plate
 Nissan Bump Stop
 Nissan Front Cross-Member
Browse by Model
200SX Coil Springs 240SX Coil Springs 280ZX Coil Springs 300ZX Coil Springs 350Z Coil Springs 370Z Coil Springs 720 Pickup Coil Springs Altima Coil Springs ARIYA Coil Springs Armada Coil Springs Axxess Coil Springs Cube Coil Springs Datsun 310 Coil Springs Datsun 810 Coil Springs Frontier Coil Springs GT-R Coil Springs Hardbody Pickup (D21) Coil Springs Hardbody Pickup (D21U) Coil Springs Juke Coil Springs Kicks Coil Springs Kicks Play Coil Springs Leaf Coil Springs Maxima Coil Springs Murano Coil Springs NV Coil Springs Pathfinder Coil Springs Pulsar NX Coil Springs Quest Coil Springs Rogue Coil Springs Rogue Sport Coil Springs Sentra Coil Springs Stanza Coil Springs Titan Coil Springs Van Coil Springs Versa Coil Springs Versa Note Coil Springs Xterra Coil Springs Z Coil Springs