×
- Hello
- Login or Register
- Quick Links
- Live Chat
- Track Order
- Parts Availability
- RMA
- Help Center
- Contact Us
- Shop for
- Nissan Parts
- Nissan Accessories
My Garage
My Account
Cart
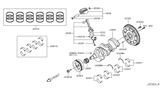
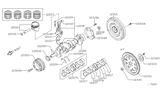
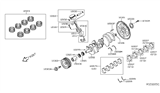
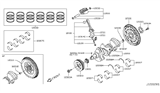
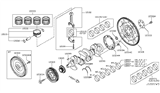
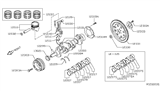
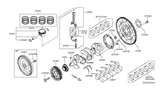
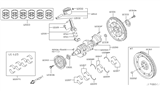
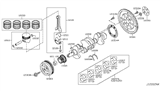
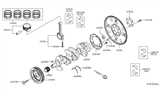
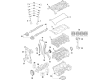
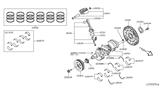
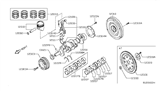
Genuine Nissan Crankshaft
Crank Shaft- Select Vehicle by Model
- Select Vehicle by VIN
Select Vehicle by Model
orMake
Model
Year
Select Vehicle by VIN
For the most accurate results, select vehicle by your VIN (Vehicle Identification Number).
120 Crankshafts found


Nissan Crankshaft Assembly
Part Number: 12201-JF00A$2378.82 MSRP: $2879.93You Save: $501.11 (18%)Ships in 1-3 Business DaysProduct Specifications- Other Name: Crankshaft


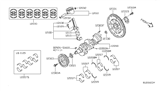
Nissan Crankshaft Assembly
Part Number: 12200-EA200$1026.43 MSRP: $1449.77You Save: $423.34 (30%)Ships in 1-3 Business DaysProduct Specifications- Other Name: Crankshaft
- Replaces: 12200-9BF0A


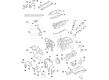
Nissan Crankshaft Assembly
Part Number: 12201-EZ40A$3535.85 MSRP: $4280.69You Save: $744.84 (18%)Ships in 1-3 Business DaysProduct Specifications- Other Name: Crankshaft Assy
- Replaced by: 12201-EZ40B


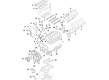
Nissan Crankshaft Assembly
Part Number: 12200-EY00A$1750.19 MSRP: $2118.87You Save: $368.68 (18%)Ships in 1-3 Business DaysProduct Specifications- Other Name: Crankshaft

Nissan Crankshaft Assembly
Part Number: 12201-ED81A$297.29 MSRP: $419.90You Save: $122.61 (30%)Ships in 1-3 Business DaysProduct Specifications- Other Name: Crankshaft
- Manufacturer Note: REFERENCE< EN20A
- Replaces: 12200-ED81A, 12201-ED80A, 12200-ED810, 12200-ED80A, 12201-ED810
- Product Specifications
- Other Name: Crankshaft
- Replaces: 12201-EZ40A
Nissan Crankshaft Assembly
Part Number: 12200-6KA0A$364.67 MSRP: $515.07You Save: $150.40 (30%)Ships in 1-3 Business DaysProduct Specifications- Other Name: Crankshaft

Nissan Crankshaft Assembly
Part Number: 12201-9BT0A$862.52 MSRP: $1218.25You Save: $355.73 (30%)Ships in 1-3 Business DaysProduct Specifications- Other Name: Crankshaft
Nissan CRANKSHAFT ASSY
Part Number: 12201-5CA0A$1413.77 MSRP: $1711.59You Save: $297.82 (18%)Ships in 1-2 Business DaysProduct Specifications- Other Name: Crankshaft
Nissan Crankshaft Assembly
Part Number: 12200-JA12B$408.01 MSRP: $576.28You Save: $168.27 (30%)Ships in 1-3 Business DaysProduct Specifications- Other Name: Crankshaft
- Replaces: 12200-JA11B, 12201-JA10B

Nissan Crankshaft Assembly
Part Number: 12201-1KC0A$1170.69 MSRP: $1653.52You Save: $482.83 (30%)Ships in 1-3 Business DaysProduct Specifications- Other Name: Crankshaft

Nissan Crankshaft Assembly
Part Number: 12200-JK21A$1555.00 MSRP: $1882.57You Save: $327.57 (18%)Ships in 1-3 Business DaysProduct Specifications- Other Name: Crankshaft
- Replaces: 12200-JK20A

Nissan Crankshaft Assembly
Part Number: 12201-3TA0A$1302.87 MSRP: $1577.33You Save: $274.46 (18%)Ships in 1-3 Business DaysProduct Specifications- Other Name: Crankshaft
- Replaces: 12201-JA00A, 12201-JA02A, 12201-JA03A, 12201-JA01A
Nissan Crankshaft Assembly
Part Number: 12201-6LB0A$526.21 MSRP: $743.23You Save: $217.02 (30%)Ships in 1-3 Business DaysProduct Specifications- Other Name: Crankshaft

Nissan Crankshaft Assembly
Part Number: 12201-9HP0C$658.04 MSRP: $1398.70You Save: $740.66 (53%)Ships in 1-2 Business DaysProduct Specifications- Other Name: Crankshaft Assy. This item is non-returnable.; Crankshaft

Nissan Crankshaft Assembly
Part Number: 12201-5RB0A$998.86 MSRP: $1410.82You Save: $411.96 (30%)Ships in 1-3 Business DaysProduct Specifications- Other Name: Crankshaft
- Replaced by: 12200-5RB0A
Nissan Crankshaft Assembly
Part Number: 12200-5RB0A$998.86 MSRP: $1410.82You Save: $411.96 (30%)Ships in 1-3 Business DaysProduct Specifications- Other Name: Crankshaft
- Replaces: 12201-5RB0A

Nissan Crankshaft Assembly
Part Number: 12200-JA10A$1309.07 MSRP: $1584.83You Save: $275.76 (18%)Ships in 1-3 Business DaysProduct Specifications- Other Name: Crankshaft
- Replaces: 12200-JA11A
Nissan Crankshaft Assembly
Part Number: 12201-1VA0A$1197.58 MSRP: $1449.86You Save: $252.28 (18%)Ships in 1-3 Business DaysProduct Specifications- Other Name: Crankshaft
- Replaces: 12200-1VA0A
 Product Specifications
- Other Name: Crankshaft
| Page 1 of 6 |Next >
1-20 of 120 Results
About Nissan Crankshaft
Every part of your vehicle is very important, you can't ignore any one, especially Nissan Crankshaft. In case the Nissan Crankshaft is damaged or broken, you should find ways to repair it or look for replacements if it's already beyond repair. Because of all the parts can't stand alone, the broken Crankshaft must affect other parts. If you find your Nissan Crankshaft can't work normal, just repair it or come to our website to search the OEM Nissan Crankshafts.
Nissan Crankshaft Parts Questions & Experts Answers
- Q: How to remove the crankshaft from the engine on Nissan 300ZX?A:Remove the oil pan, followed by the pick-up tube and oil pump. Next, take out the connecting rods and pistons, then remove the four oil seal retainer bolts. Pull the oil seal retainer from the retaining pins to detach it. Loosen each of the main bearing cap assembly retaining bolts a quarter turn at a time, in the correct numerical order, until they can be removed by hand. Ensure the main bearing cap assembly is marked with an arrow pointing to the front of the engine; if not, mark it accordingly to ensure proper reinstallation. Gently tap the cap assembly with a soft face hammer to separate it from the engine block, using the main bearing cap bolts as levers if necessary, and take care not to drop the bearing inserts. Finally, carefully lift the crankshaft out of the engine, ideally with assistance due to its weight, and with the bearing inserts in place, return the cap assembly to the engine block and tighten the bolts finger tight.
- Q: What steps should be followed to remove the pistons, connecting rods, and crankshaft while ensuring proper handling of the main bearing caps and shells on Nissan Juke?A:Remove the pistons and connecting rods as needed, ensuring that if no work is required on them, the cylinder head does not need to be removed, and the pistons should only be pushed up enough to clear the crankshaft journals. Check the crankshaft endfloat, and ensure the main bearing caps are numbered 1 to 5 from the timing chain end for petrol engines or from the flywheel end for diesel engines; if they are not numbered, mark each cap to indicate its correct orientation and position. Progressively slacken the main bearing cap retaining bolts from the outer ends to the center, then unscrew and remove them from the cylinder block. Withdraw the bearing caps and recover the lower main bearing shells, taping each shell to its respective cap for safekeeping. Carefully lift out the crankshaft, ensuring the upper main bearing shells remain in place, then recover the upper bearing shells from the cylinder block and tape them to their respective caps. Finally, remove the thrustwasher halves from the side of No 3 main bearing and store them with the bearing cap.
- Q: How to remove the crankshaft from an engine on Nissan Maxima?A:The crankshaft can only be removed after the engine has been taken out of the vehicle, assuming that the flywheel/driveplate, crankshaft pulley, timing belt for SOHC engines, timing chain for DOHC engines, sprockets, oil pan, oil pump, and piston/connecting rod assemblies have been detached. Before removing the crankshaft, check the endplay by mounting a dial indicator aligned with the crankshaft and touching one of the crank throws. Push the crankshaft to the rear and zero the dial indicator, then pry it to the front and check the reading to determine the endplay. If it exceeds the specified limit, inspect the crankshaft thrust surfaces for wear; if no wear is found, new main bearings may resolve the issue. If a dial indicator is unavailable, feeler gauges can be used by prying or pushing the crankshaft forward and measuring the clearance between it and the rear main bearing. Loosen the main bearing cap bolts gradually until the cap and brace assembly can be removed by hand, ensuring to follow the reverse of the tightening sequence. Gently tap the cap assembly with a soft-face hammer to separate it from the engine block, using the bolts as levers if necessary, and take care not to drop the bearing inserts. Carefully lift the crankshaft out, possibly with assistance due to its weight, and return the cap assembly to its position on the engine block, tightening the bolts finger tight. For 2002 or later models, unbolt the oil jets from the cylinder block. On DOHC engines, check the main bearing cap bolts for excessive stretching; if there is a difference of 0.0043 inch (0.11 mm) or more in diameter between indicated areas, the bolts should be replaced, often making it more economical to buy a complete set rather than individual bolts.


Related Nissan Parts
 Nissan Rod Bearing
 Nissan Oil Pump
 Nissan Piston Ring Set
 Nissan Cam Gear
 Nissan Crankshaft Thrust Washer Set
 Nissan Camshaft
 Nissan Oil Pump Gasket
 Nissan Oil Pan Gasket
 Nissan Crankshaft Pulley
 Nissan Oil Pan
 Nissan Crankshaft Gear
Browse by Model
200SX Crankshaft 240SX Crankshaft 280ZX Crankshaft 300ZX Crankshaft 350Z Crankshaft 370Z Crankshaft 720 Pickup Crankshaft Altima Crankshaft Armada Crankshaft Axxess Crankshaft Cube Crankshaft Datsun 310 Crankshaft Datsun 810 Crankshaft Frontier Crankshaft GT-R Crankshaft Hardbody Pickup (D21) Crankshaft Hardbody Pickup (D21U) Crankshaft Juke Crankshaft Kicks Crankshaft Maxima Crankshaft Murano Crankshaft NV Crankshaft Pathfinder Crankshaft Pulsar NX Crankshaft Quest Crankshaft Rogue Crankshaft Rogue Sport Crankshaft Sentra Crankshaft Stanza Crankshaft Titan Crankshaft Van Crankshaft Versa Crankshaft Versa Note Crankshaft Xterra Crankshaft Z Crankshaft