×
- Hello
- Login or Register
- Quick Links
- Live Chat
- Track Order
- Parts Availability
- RMA
- Help Center
- Contact Us
- Shop for
- Nissan Parts
- Nissan Accessories
My Garage
My Account
Cart
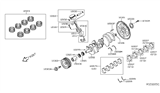
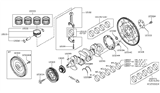
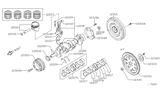
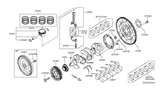
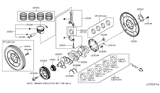
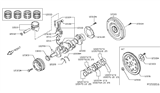
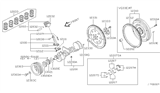
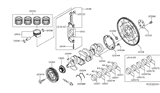
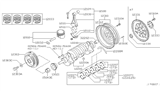
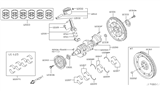
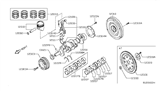
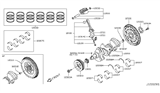
Genuine Nissan Flywheel
Clutch Flywheel- Select Vehicle by Model
- Select Vehicle by VIN
Select Vehicle by Model
orMake
Model
Year
Select Vehicle by VIN
For the most accurate results, select vehicle by your VIN (Vehicle Identification Number).
144 Flywheels found


Nissan Drive & Gear Plate
Part Number: 12331-1CA0B$284.25 MSRP: $401.48You Save: $117.23 (30%)Ships in 1-3 Business DaysProduct Specifications- Other Name: Plate Assy-Drive & Gear; Drive Plate


Nissan Drive & Gear Plate
Part Number: 12331-ED01A$228.19 MSRP: $322.30You Save: $94.11 (30%)Ships in 1-2 Business DaysProduct Specifications- Other Name: Plate Assy-Drive & Gear; Drive Plate
- Manufacturer Note: AT/CVT
- Replaces: 12331-ED01C


Nissan Flywheel Assembly
Part Number: 12310-EA200$627.71 MSRP: $886.60You Save: $258.89 (30%)Ships in 1-3 Business DaysProduct Specifications- Other Name: Flywheel
- Manufacturer Note: MANUAL TRANSMISSION

Nissan Flywheel Assembly
Part Number: 12310-1KA0A$547.73 MSRP: $773.63You Save: $225.90 (30%)Ships in 1-3 Business DaysProduct Specifications- Other Name: Flywheel
- Manufacturer Note: MT
- Replaces: 12310-EE000, 12310-3HC0A


Nissan Flywheel Assembly
Part Number: 12310-ET02C$720.86 MSRP: $1018.17You Save: $297.31 (30%)Ships in 1-2 Business DaysProduct Specifications- Other Name: Flywheel
- Replaces: 12310-ET000, 12310-ET01C, 12310-ET00A


Nissan Flywheel Assembly
Part Number: 12310-EA000$446.52 MSRP: $630.68You Save: $184.16 (30%)Ships in 1-3 Business DaysProduct Specifications- Other Name: Flywheel


Nissan Flywheel Assembly
Part Number: 12310-1KC1A$970.15 MSRP: $1370.27You Save: $400.12 (30%)Ships in 1-3 Business DaysProduct Specifications- Other Name: Flywheel
- Manufacturer Note: MT
- Replaces: 12310-1KC0A


Nissan Flywheel
Part Number: 12311-EZ40A$150.34 MSRP: $212.35You Save: $62.01 (30%)Ships in 1-3 Business DaysProduct Specifications- Other Name: Drive Plate


Nissan Flywheel Assembly
Part Number: 12310-8J100$409.74 MSRP: $578.73You Save: $168.99 (30%)Ships in 1-3 Business DaysProduct Specifications- Other Name: Flywheel


Nissan Flywheel Assembly
Part Number: 12310-F4500$449.26 MSRP: $634.55You Save: $185.29 (30%)Ships in 1-3 Business DaysProduct Specifications- Other Name: Drive Plate, Flywheel
- Replaces: 12310-F4004, 12310-F4003, 12310-F4001

Nissan Drive & Gear Plate Assembly
Part Number: 12331-ED00A$389.36 MSRP: $549.95You Save: $160.59 (30%)Ships in 1-3 Business DaysProduct Specifications- Other Name: Plate Assy-Drive & Gear; Drive Plate

Nissan Plate-DRV&Gear
Part Number: 12331-6RA0B$303.05 MSRP: $428.03You Save: $124.98 (30%)Ships in 1-3 Business DaysProduct Specifications- Other Name: Drive Plate
- Replaces: 12331-4BA0A

Nissan Flywheel Assembly
Part Number: 12310-8H301$484.57 MSRP: $684.42You Save: $199.85 (30%)Ships in 1-3 Business DaysProduct Specifications- Other Name: Flywheel

Nissan Flywheel Assembly
Part Number: 12310-CD001$1376.52 MSRP: $1666.49You Save: $289.97 (18%)Ships in 1-3 Business DaysProduct Specifications- Other Name: Flywheel


Nissan Flywheel Assembly
Part Number: 12310-ET00A$720.86 MSRP: $1018.17You Save: $297.31 (30%)Ships in 1-3 Business DaysProduct Specifications- Manufacturer Note: 08/01 SAIYOU YOTEI
- Replaced by: 12310-ET02C
Nissan Flywheel Assembly
Part Number: 12310-JA00A$530.68 MSRP: $749.55You Save: $218.87 (30%)Ships in 1-3 Business DaysProduct Specifications- Other Name: Flywheel
Nissan Flywheel Assembly
Part Number: 12310-0W001$639.68 MSRP: $903.50You Save: $263.82 (30%)Ships in 1-3 Business DaysProduct Specifications- Other Name: Drive Plate, Flywheel
- Replaces: 12310-0W000

Nissan Drive & Gear Plate Assembly
Part Number: 12331-1KC0B$422.27 MSRP: $596.43You Save: $174.16 (30%)Ships in 1-3 Business DaysProduct Specifications- Other Name: Plate Assy-Drive & Gear; Drive Plate
- Replaces: 12331-1KC0A
Nissan Flywheel Assembly
Part Number: 12310-JA10A$553.51 MSRP: $781.80You Save: $228.29 (30%)Ships in 1-3 Business DaysProduct Specifications- Other Name: Flywheel
- Manufacturer Note: MANUAL TRANSMISSION

Nissan Flywheel Assembly
Part Number: 12310-EY00A$1280.44 MSRP: $1550.17You Save: $269.73 (18%)Ships in 1-3 Business DaysProduct Specifications- Other Name: Flywheel
- Manufacturer Note: MT
| Page 1 of 8 |Next >
1-20 of 144 Results
About Nissan Flywheel
Flywheel stores the energy for usage. When the torque is applied to the flywheel, it energy is preserved in its rotational momentum. When they need more energy, the energy is gathered and the flywheel slows the speed. The flywheels we use nowadays utilize magnets to rotate, and the speed can be tens of thousands of times per minute. What’s more, the flywheels, comparing to earlier one, generates mechanical and electrical energy, and some are even for solar and wind energy. Generally speaking, the flywheels are inexpensive and more reliable than batteries. It is quite important for you to have a top shape flywheel in your Nissan car. You are supposed to do regular maintenance and check if your flywheel works properly. Once you decide to change, we are glad to be your first choice and we offer you all Nissan genuine OEM flywheel with a discounted price.
Nissan Flywheel Parts Questions & Experts Answers
- Q: How to properly remove, inspect, and install the flywheel to ensure correct alignment and prevent future issues on 4 cylinder Nissan Altima?A:To remove the engine/transaxle assembly, first separate the transaxle from the engine. If a manual transmission is present, take out the pressure plate and clutch disc. Use a center-punch or paint to create alignment marks on the flywheel/driveplate and crankshaft for correct alignment during installation. Remove the bolts securing the flywheel/driveplate to the crankshaft and then take off the flywheel/driveplate. For installation, if a manual transaxle is present, clean the flywheel to eliminate grease and oil, inspecting it for cracks, rivet grooves, burned areas, and score marks, with light scoring removable using emery cloth. Check for cracked and broken ring-gear teeth, laying the flywheel on a flat surface to check for warpage with a straightedge. Clean and inspect the mating surfaces of the flywheel/driveplate and crankshaft, replacing the crankshaft rear seal if it is leaking before reinstalling. Position the flywheel/driveplate against the crankshaft, ensuring the spacer is installed (if equipped) and aligning the marks made during removal. Some engines may have an alignment dowel or staggered bolt holes for correct installation. Apply thread-locking compound to the bolt threads before tightening, using a screwdriver wedged in the ring gear teeth to prevent movement, and follow a criss-cross pattern to reach the final torque in three or four steps. The remainder of the installation follows the reverse order of removal, and finally, reconnect the battery and perform the necessary re-learn procedures.
- Q: How to remove and inspect a flywheel on 1.2L petrol Nissan Juke?A:Regarding the modification process, one has first to cancel the flywheel by first unbolting the transmission and then the clutch. To stop the flywheel from spinning you should either wedged the ring gear teeth with a bar, or else put a strap from the flywheel to the cylinder block. Then unscrew and take out the retaining bolts and finally, the flywheel is slid off the crankshaft with careful not to drop it since they are very heavy. For inspection, if clutch mating surface of the flywheel is deeply scored, Cracked or damaged, then it has to be replaced, it is recommended to consult a nissan dealer or any reputable engine reconditioning service. However, if the ring gear becomes worn or acquired without some teeth, it also needs to be replaced, and it is suggested to consult with Nissan dealer or specialist whether it is possible to restore. Cleansing of the mating surfaces of the flywheel as well as the crankshaft is done before positioning of the flywheel and new retaining bolts necessary for refitting done. Lock the ring gear similar to the previous step and torque the retaining bolts up to the required measure in two steps using an angle tightening gauge. Last but not the least, a clutch should be re-fixed while the lock tool should be removed from the transmission before fixing it.
- Q: How to properly remove and reinstall a flywheel or driveplate on Nissan Maxima with DOHC engine?A:Raise the vehicle and support it securely on jackstands. If equipped with a manual transaxle, remove the pressure plate and clutch disc, taking the opportunity to check or replace the clutch components and pilot bearing if necessary. For vehicles with an automatic transaxle, check and replace the front pump seal or O-ring. Use paint or a center-punch to make alignment marks on the flywheel or driveplate and crankshaft to ensure correct alignment during reinstallation. Remove the bolts securing the flywheel or driveplate to the crankshaft, and if the crankshaft turns, hold the flywheel or driveplate with a pry bar or jam a screwdriver into the ring gear teeth. Carefully remove the flywheel or driveplate from the crankshaft, supporting it while removing the last bolt due to its weight. Clean the flywheel to remove grease and oil, inspecting the surface for cracks, rivet grooves, burned areas, and score marks, with light scoring removable using emery cloth. Check for cracked or broken ring gear teeth or a loose ring gear, laying the flywheel on a flat surface to check for warpage with a straightedge. Clean and inspect the mating surfaces of the flywheel or driveplate and crankshaft, replacing the crankshaft rear seal if leaking before reinstalling. Position the flywheel or driveplate against the crankshaft, aligning the marks made during removal, and noting any alignment dowels or staggered bolt holes for correct installation. Apply thread locking compound to the bolt threads before tightening, using a screwdriver wedged into the ring gear teeth to prevent turning. Complete the installation by reversing the removal process.


Related Nissan Parts

Browse by Model
200SX Flywheel 240SX Flywheel 280ZX Flywheel 300ZX Flywheel 350Z Flywheel 370Z Flywheel 720 Pickup Flywheel Altima Flywheel Armada Flywheel Axxess Flywheel Cube Flywheel Datsun 310 Flywheel Datsun 810 Flywheel Frontier Flywheel GT-R Flywheel Hardbody Pickup (D21) Flywheel Hardbody Pickup (D21U) Flywheel Juke Flywheel Kicks Flywheel Maxima Flywheel Murano Flywheel NV Flywheel Pathfinder Flywheel Pulsar NX Flywheel Rogue Flywheel Rogue Sport Flywheel Sentra Flywheel Stanza Flywheel Titan Flywheel Van Flywheel Versa Flywheel Versa Note Flywheel Xterra Flywheel Z Flywheel