×
- Hello
- Login or Register
- Quick Links
- Live Chat
- Track Order
- Parts Availability
- RMA
- Help Center
- Contact Us
- Shop for
- Nissan Parts
- Nissan Accessories
My Garage
My Account
Cart
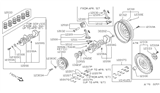
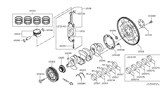
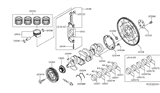
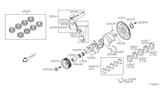
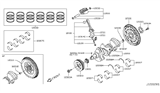
Genuine Nissan Piston
Engine Pistons- Select Vehicle by Model
- Select Vehicle by VIN
Select Vehicle by Model
orMake
Model
Year
Select Vehicle by VIN
For the most accurate results, select vehicle by your VIN (Vehicle Identification Number).
684 Pistons found


Nissan Piston With Pin
Part Number: 12010-EZ49B$98.80 MSRP: $139.55You Save: $40.75 (30%)Ships in 1-3 Business DaysProduct Specifications- Other Name: Piston-W/Pin; Piston
Nissan Piston W/Pin
Part Number: 12010-EZ49C$857.27 MSRP: $1210.83You Save: $353.56 (30%)Ships in 1-3 Business DaysProduct Specifications- Replaces: 12010-EZ49A

Nissan Piston W/PIN L/H GRD 1
Part Number: A2010-9FV0B$77.82 MSRP: $109.92You Save: $32.10 (30%)Ships in 1-3 Business DaysProduct Specifications- Other Name: Piston
- Replaces: A2010-EZ30D
Nissan Piston W/PIN R/H GRD 1
Part Number: A2010-9FV0A$86.68 MSRP: $122.43You Save: $35.75 (30%)Ships in 1-3 Business DaysProduct Specifications- Other Name: Piston
- Replaces: A2010-EZ30C

Nissan Piston W/Pin
Part Number: 12010-9BP0C$52.66 MSRP: $72.60You Save: $19.94 (28%)Ships in 1-3 Business DaysProduct Specifications- Other Name: Piston

Nissan Piston W/Pin
Part Number: A2010-8J011$59.54 MSRP: $82.02You Save: $22.48 (28%)Ships in 1-2 Business DaysProduct Specifications- Other Name: Piston-W/Pin. This item subject to a 40% restocking fee if returned.; Piston
- Manufacturer Note: STD 2
- Replaces: A2010-8J001

Nissan Piston W/Pin
Part Number: 12010-EA20B$94.26 MSRP: $133.13You Save: $38.87 (30%)Ships in 1 Business DayProduct Specifications- Other Name: Piston-W/Pin; Piston
- Manufacturer Note: GRADE-PISTON 1,PIN 0
- Replaces: 12010-EA205, 12010-EA200
Nissan Piston W/PIN R/H GRD 3
Part Number: A2010-9FV2A$77.82 MSRP: $109.92You Save: $32.10 (30%)Ships in 1-3 Business DaysProduct Specifications- Other Name: Piston
- Replaces: A2010-EZ32C
Nissan Piston With Pin
Part Number: 12010-53F01$52.58 MSRP: $81.47You Save: $28.89 (36%)Ships in 1-2 Business DaysProduct Specifications- Other Name: Piston-W/Pin. This item subject to a 40% restocking fee if returned.
- Manufacturer Note: STD GRADE 2
- Replaces: 12010-53F06
Nissan Piston With Pin
Part Number: 12010-6LB0A$65.54 MSRP: $92.57You Save: $27.03 (30%)Ships in 1-3 Business DaysProduct Specifications- Other Name: Piston-W/Pin; Piston

Nissan Piston With Pin
Part Number: 12010-6KA0B$182.19 MSRP: $257.33You Save: $75.14 (30%)Ships in 1-3 Business DaysProduct Specifications- Other Name: Piston-W/Pin; Piston
- Position: Driver Side
Nissan Piston With Pin
Part Number: 12010-V7103$58.87 MSRP: $99.87You Save: $41.00 (42%)Ships in 1-2 Business DaysProduct Specifications- Other Name: Piston-W/Pin. This item subject to a 40% restocking fee if returned.
- Manufacturer Note: OS=0.50
- Replaces: 12010-V5903, 12010-V5913
Nissan Piston W/PIN L/H GRD 2
Part Number: A2010-9FV1B$75.23 MSRP: $106.25You Save: $31.02 (30%)Ships in 1-3 Business DaysProduct Specifications- Other Name: Piston
- Replaces: A2010-EZ31D
Nissan Piston W/PIN R/H GRD 2
Part Number: A2010-9FV1A$75.23 MSRP: $106.25You Save: $31.02 (30%)Ships in 1-3 Business DaysProduct Specifications- Other Name: Piston
- Replaces: A2010-EZ31C

Nissan Piston With Pin
Part Number: A2010-3TU1A$93.95 MSRP: $132.70You Save: $38.75 (30%)Ships in 1-3 Business DaysProduct Specifications- Other Name: Piston-W/Pin; Piston
- Manufacturer Note: SDT GRADE 2-0
Nissan Piston With Pin
Part Number: 12010-6KA0A$176.08 MSRP: $248.70You Save: $72.62 (30%)Ships in 1-3 Business DaysProduct Specifications- Other Name: Piston-W/Pin; Piston
- Position: Passenger Side
Nissan Piston,W/Pin
Part Number: 12010-3TA1B$81.25 MSRP: $114.77You Save: $33.52 (30%)Ships in 1-3 Business DaysProduct Specifications- Other Name: Piston-W/Pin; Piston
- Manufacturer Note: GRADE-PISTON 3-0

Nissan Piston W/Pin
Part Number: 12010-1LU0A$93.76 MSRP: $132.43You Save: $38.67 (30%)Ships in 1-3 Business DaysProduct Specifications- Other Name: Piston-W/Pin; Piston
Nissan Piston With Pin
Part Number: 12010-6KA1A$182.19 MSRP: $257.33You Save: $75.14 (30%)Ships in 1-3 Business DaysProduct Specifications- Other Name: Piston-W/Pin; Piston
- Position: Passenger Side

Nissan Piston With Pin
Part Number: A2010-1EA0B$172.23 MSRP: $243.27You Save: $71.04 (30%)Ships in 1-3 Business DaysProduct Specifications- Other Name: Piston-W/Pin; Piston
- Manufacturer Note: STD GRADE 1
- Position: Driver Side
| Page 1 of 35 |Next >
1-20 of 684 Results
Nissan Piston Parts Questions & Experts Answers
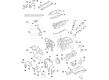
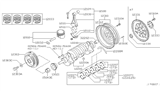
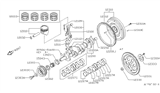
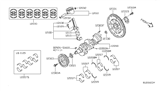
- Q: What steps should be followed before installing the piston and connecting rod assemblies on Nissan 300ZX?A:Before installing the piston and connecting rod assemblies, ensure the cylinder walls are clean, the top edge of each cylinder is chamfered, and the crankshaft is in place. Remove the connecting rod cap from the number one connecting rod, take out the old bearing inserts, and wipe the bearing surfaces with a clean, lint-free cloth. Clean the back side of the new upper bearing half and lay it in place in the connecting rod, ensuring the tab fits into the recess without hammering or nicking the bearing face, and do not lubricate at this time. Clean the back side of the other bearing insert and install it in the rod cap, again ensuring the tab fits into the recess without applying lubricant. Position the piston ring gaps correctly and slip a section of plastic or rubber hose over the connecting rod cap bolts. Lubricate the piston and rings with clean engine oil, attach a piston ring compressor, and allow the piston skirt to protrude about one-quarter inch to guide it into the cylinder. Rotate the crankshaft until the number one connecting rod journal is at bottom dead center and apply a uniform coat of engine oil to the cylinder walls. With the dot on top of the piston facing the front of the engine, gently place the piston and connecting rod assembly into the number one cylinder bore, resting the bottom edge of the ring compressor on the engine block, and tap the top edge to ensure contact around the circumference. Clean the number one connecting rod journal on the crankshaft and the bearing faces in the rod. Carefully tap the top of the piston with a wooden hammer handle while guiding the connecting rod into place on the crankshaft journal, maintaining downward pressure on the ring compressor to prevent the piston rings from popping out. If resistance is felt, stop immediately to identify and resolve the issue without forcing the piston. After installation, check the connecting rod bearing oil clearance before permanently bolting the rod cap in place by cutting a piece of Plastigage and laying it on the number one connecting rod journal. Clean the connecting rod cap bearing face, install the rod cap ensuring the mating marks align, and tighten the nuts to the specified torque without rotating the crankshaft. Remove the rod cap carefully to avoid disturbing the Plastigage, compare the width of the crushed material to the scale on the container to obtain the oil clearance, and ensure it matches the specified clearance. If not, double-check the bearing inserts and crankshaft journal diameter for cleanliness. Scrape off any Plastigage material carefully, apply a layer of moly-based grease or engine assembly lube to the bearing faces, and push the piston into the cylinder to expose the bearing insert face. Slide the connecting rod back into place, remove the protective hoses, install the rod cap, and tighten the nuts to the specified torque in three steps. Repeat the procedure for the remaining piston and connecting rod assemblies, keeping everything clean and ensuring the correct piston is used with the dot facing the front of the engine. After all assemblies are installed, rotate the crankshaft by hand to check for binding. Check the connecting rod end play using either a feeler gauge or a dial indicator, comparing measurements to the specified end play. If measurements do not agree, verify the bearing inserts and consider replacing rods or the crankshaft if necessary.
- Q: How to properly remove the pistons from the cylinder block on Nissan Juke?A:Remove the sump, timing chain/belt, oil pump, and cylinder head. For petrol engines, take off the flywheel, then undo the retaining bolts and detach the upper alloy part of the sump from the bottom of the cylinder block. On 1.2 litre petrol engines, undo the retaining bolts and remove the main bearing cap support beam. If there is a pronounced wear ridge at the top of any bore, it may be necessary to remove it with a scraper or ridge reamer to avoid piston damage during removal, as such a ridge indicates excessive wear of the cylinder bore. Each connecting rod and bearing cap should be stamped with its respective cylinder number, with No 1 cylinder located at the timing chain end of the engine, and big-end caps marked with a centre punch. If no markings are visible, use quick-drying paint or similar to mark each connecting rod and big-end bearing cap with its respective cylinder number on the flat machined surface provided. Turn the crankshaft to bring pistons 1 and 4 to bottom dead centre. Unscrew the belts from No 1 piston big-end bearing cap, remove the cap, and recover the bottom half bearing shell. If the bearing shells are to be reused, tape the cap and the shell together. Using a hammer handle, push the piston up through the bore and remove it from the top of the cylinder block, recovering the bearing shell and taping it along with the connecting rod for safekeeping. Loosely refit the big-end cap to the connecting rod and secure with the bolts to help keep the components in their correct order. Remove No 4 piston assembly in the same manner. Turn the crankshaft through 180° to bring pistons 2 and 3 to bottom dead centre, and remove them in the same way.
- Q: How to install piston and connecting rod assemblies, including preparation, installation, and checking clearances on Nissan Maxima?A:Piston/Connecting Rod Assemblies must be fitted before the following conditions are met,Cylinder walls must be clean, the top edge of every cylinder must be chamfered and crank-shaft must be positioned. Take off the cap of the number one connecting rod as you prior marked, and also wipe out the bearing surfaces by using a lint free cloth. Clean the back side of the new upper bearing insert and place it in the connecting rod, All that the tab has to be fitted outside to the recess without hammering it at all. Perform this same action for the lower bearing insert of the connecting rod on the corresponding cap; all the mating surfaces should be clean and free of oil. Align the cylinder number(s) of the piston ring gaps at necessary distance, inserted a hose to each connecting rod cap bolt, treat the piston and rings with clean engine oil and put on a piston ring compressor, with the piston skirt outside. Scribe a line across the crankshaft and turn until the number one connecting rod journal is at BDC, then lubricate the cylinder walls with engine oil. Place the piston/connecting rod assembly into the cylinder bore with the notch facing the direction of the drivebelt end: the ring compressor should bear against the block's surface. Start the connecting rod into the slot of the piston carefully and avoid any concentrated force on the pieces. Upon the completion of installation, the width of Cr-Mo connecting rod bearing oil clearance should be measured using Plastigage and the result of the crushed scaled for a proper measurement. If that is the case, ensure that clearance is tested alongside cleanliness since the diameter of the journal defines another set of bearing inserts. Oil or remove any Plastigage residue gently and spread a layer of moly-base grease or engine assembly lube on the empirical bearing seats, then replace the connecting rod and cap and tighten nuts to the appropriate measure. The same process needs to be done for the other assemblies, clean bearing inserts, make sure the right piston/rod assembly is used and lubrication of cylinder walls. Check the binding of the crankshaft after the installation while turning with your hand and measure the connecting rod end play of the crankshaft and compare it with the manufacturer's standard to ensure it is correct. If changes are to be made, seek an automotive machine shop for resizing, or a new rod if the end play is immense.


Related Nissan Parts
 Nissan Belt Tensioner Bolt
 Nissan Crankshaft Thrust Washer Set
 Nissan Crankshaft Pulley
 Nissan Crankshaft
 Nissan Crankshaft Gear
 Nissan Alternator Bracket
 Nissan Brake Caliper Bracket
Browse by Model
200SX Piston 240SX Piston 280ZX Piston 300ZX Piston 350Z Piston 370Z Piston 720 Pickup Piston Altima Piston Armada Piston Axxess Piston Cube Piston Datsun 310 Piston Datsun 810 Piston Frontier Piston GT-R Piston Hardbody Pickup (D21) Piston Hardbody Pickup (D21U) Piston Juke Piston Kicks Piston Maxima Piston Murano Piston NV Piston Pathfinder Piston Pulsar NX Piston Quest Piston Rogue Piston Rogue Sport Piston Sentra Piston Stanza Piston Titan Piston Van Piston Versa Note Piston Versa Piston Xterra Piston Z Piston